There’s something about the first bite of a Lemon Blueberry Bars Recipe that instantly takes me back to sunny afternoons spent on the porch with family. The tangy lemon and juicy burst of blueberries beautifully balance each other, creating that perfect harmony of sweet and tart I can’t get enough of. I’ve made these bars for gatherings, and honestly, they’re always the first to disappear—everyone loves how refreshing they are without feeling too heavy.
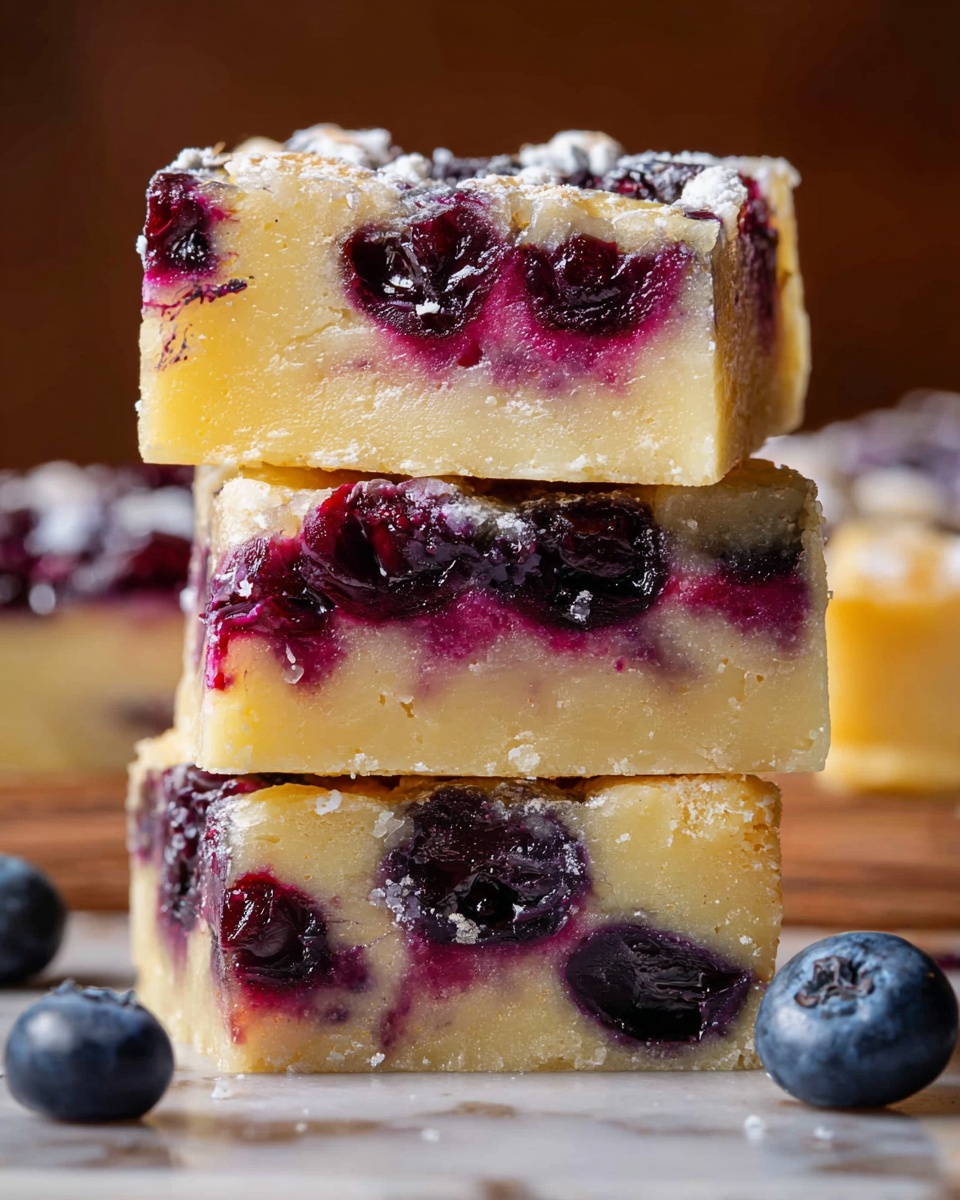
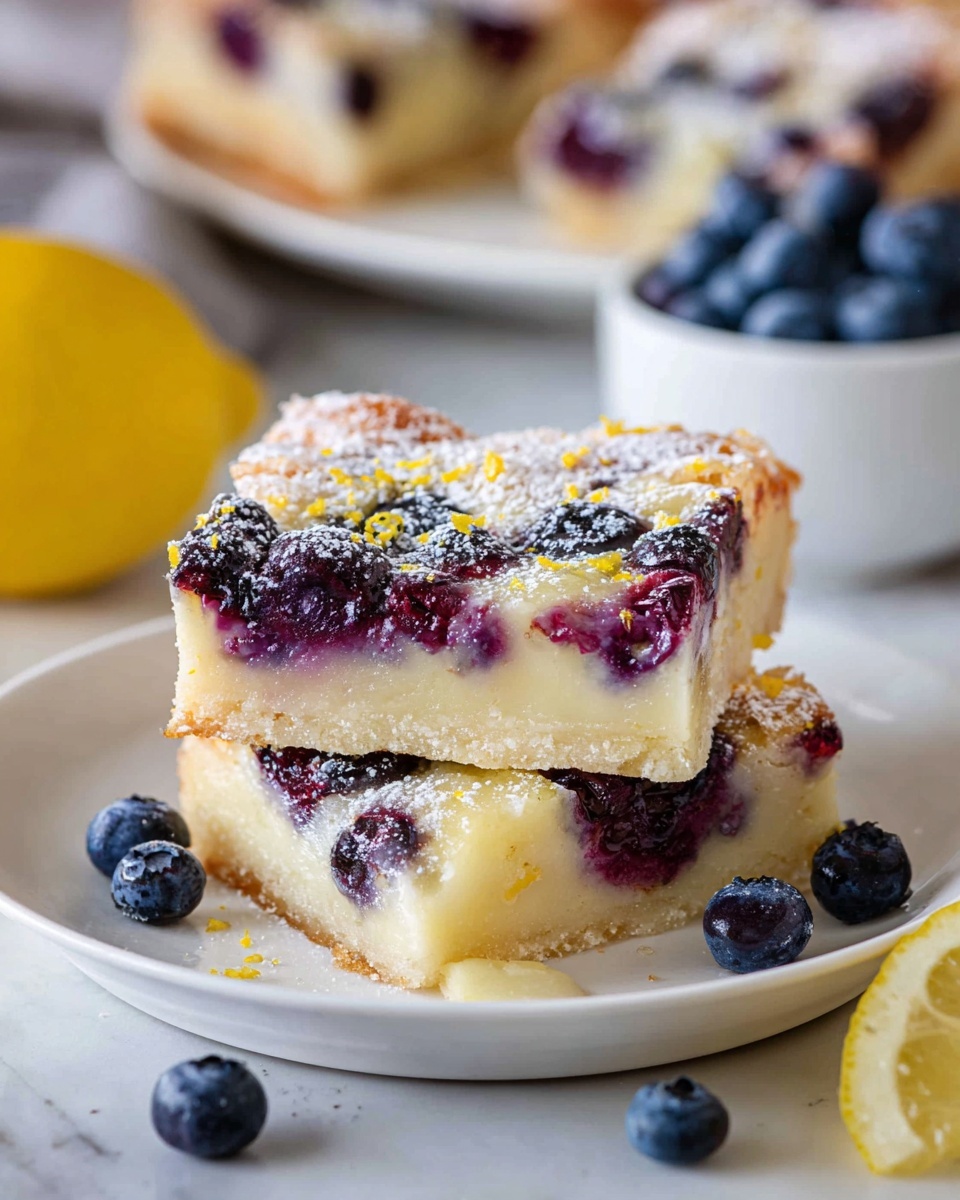
What makes this Lemon Blueberry Bars Recipe stand out is its incredible combination of bright citrus flavor with the pop of fresh blueberries nestled in a buttery, tender crust. The aroma as it bakes fills your kitchen with that inviting lemony zest, and the texture contrast between the soft filling and slightly crisp edges makes each bite delightful. Plus, these bars look gorgeous with their vibrant blueberries peeking through and a light dusting of powdered sugar for a delicate finish.
If you’re feeling a bit intimidated by lemon desserts, don’t worry! This recipe is surprisingly simple, and I’ll walk you through every step so you can get perfect bars even on your first go. From mixing the crust just right to knowing when the filling is perfectly set, I’ll share handy tips along the way so you can impress your family or friends with ease.
Why This Recipe Shines
- Flavor Harmony: The bright lemon juice perfectly balances the sweetness of the blueberries for a refreshing burst.
- Easy Assembly: Simple steps and beginner-friendly techniques get you delicious bars without stress.
- Texture Play: Buttery crust meets tender, custardy filling dotted with juicy berries—so satisfying!
- Showstopper Finish: Dusting with powdered sugar adds a delicate, elegant touch that looks as good as it tastes.
Ingredients You’ll Be Working With
I recommend using accurate measuring tools and spoons to keep the texture and balance just right. Don’t forget to check the printable recipe card below for exact amounts and tips.
- All-purpose flour: The base of your crust and filling; spoon and level for tender crust and smooth filling.
- Unsalted butter: Room temperature for an easy mix in the crust; controls saltiness.
- Granulated sugar: Sweetens both crust and filling, balancing lemon tartness.
- Large eggs: Room temperature eggs give stability and creaminess to the filling.
- Lemon juice: Freshly squeezed for the brightest, most natural zing.
- Fresh blueberries: Adds juicy pops and natural sweetness; frozen can work but may add extra moisture.
- Nonstick spray and parchment paper: Essential for easy clean-up and bar removal.
If you need to swap ingredients, you can use dairy-free butter or margarine in the crust, and frozen blueberries work in a pinch (just drain them well to prevent extra wetness).
Chef’s Note
You’ll find the complete list of ingredients with exact measurements in the printable recipe card at the bottom of this post.
Tools You’ll Need
- 9×13 inch baking pan: Ideal size for perfect thickness and even baking.
- Parchment paper: Prevents sticking and makes bar removal a breeze.
- Pastry cutter or fork: Helps blend butter into flour evenly for tender crust.
- Mixing bowls: Separate bowls keep crust and filling ingredients properly mixed.
- Whisk: Smooths out filling for no lumps.
- Measuring cups and spoons: Precision is key for consistent results.
- Cooling rack: Allows bars to cool evenly without getting soggy.
How to Make Lemon Blueberry Bars Recipe
Let’s get started! Once your oven’s preheated, these bars come together quickly. Follow these clear steps, and you’ll have those irresistible bars in no time.
- Prepare your pan and crust: Preheat your oven to 350°F. Line a 9×13 inch pan with parchment paper, then spray it lightly with nonstick cooking spray—this helps the bars lift out easily later. In a medium bowl, blend the room-temperature butter, flour, and sugar using a pastry cutter or fork until it looks crumbly but holds together when pressed. Press this mixture evenly into the bottom of your pan. Bake for 23 to 25 minutes, or until the crust is firm and golden around the edges.
- Mix the filling: While the crust bakes, whisk together the sugar and flour in a medium bowl. Add the beaten eggs and continue whisking until smooth. Stir in the freshly squeezed lemon juice—fresh really makes a difference here, so avoid bottled juice for best flavor.
- Assemble and top: Pour the lemon filling evenly over your hot baked crust. Then sprinkle the fresh blueberries evenly across the top. This distribution ensures every bite has that juicy blueberry pop.
- Bake the bars: Return the pan to the oven and bake for 28 to 30 minutes. You’ll know the bars are ready when the edges start to turn golden and the filling is just set but still slightly jiggly in the center—think custard texture rather than fully firm.
- Cool completely: Let the bars cool to room temperature on a wire rack. This step is crucial for the filling to set properly and prevent sogginess. After cooling, transfer them to the refrigerator and chill for at least 2 hours—this helps the bars slice cleanly.
- Finish and serve: Just before serving, dust the bars lightly with confectioners’ sugar for a pretty and tasty finish. Use a sharp knife and warm it slightly between cuts to get clean slices.
Kitchen Wisdom
- Tip 1: Use fresh lemons for juice and zest to maximize brightness and avoid bitter notes.
- Tip 2: Don’t skip chilling; it sharpens flavors and helps bars cut neatly.
- Tip 3: Keep an eye on the filling while baking—slight jiggle means perfect custard-like texture.
- Tip 4: Warm your knife under hot water and wipe it dry before slicing—easy clean cuts every time.
How to Serve
Flavor Boosters
Give your Lemon Blueberry Bars Recipe an extra twist with a drizzle of honey or a light lemon glaze to amplify the citrus zing. A sprinkle of finely chopped fresh mint also adds a surprising fresh note, making these bars vibrant and refreshing—perfect for spring or summer.
Perfect Pairings
These bars pair wonderfully with a cup of hot tea like Earl Grey or chamomile, both of which complement the lemon’s brightness without overpowering. For a cool option, try light sparkling water with a splash of lemon and a few fresh berries to echo the flavors.
Presentation Touches
Cut the bars into neat squares or rectangles and arrange them on a pretty platter for brunch or dessert buffets. For gifting, place them in wax paper-lined boxes tied with a ribbon. Adding a small handwritten note with the name “Lemon Blueberry Bars Recipe” lets your loved ones know they’re getting something special.
Variations & Easy Swaps
- Dairy-free option: Use plant-based butter to make the crust dairy-free without sacrificing texture.
- Flavor Boost: Add lemon zest to the filling for an extra zingy lemon punch.
- Berry swap: Mix in raspberries or blackberries for a mixed berry experience.
- Crunch factor: Fold in chopped toasted almonds into the crust for a nutty twist.
- Less sweet: Reduce granulated sugar slightly if you prefer a more tart bar.
- Gluten-free crust: Substitute all-purpose flour with a gluten-free blend, adjusting as needed for texture.
Make-Ahead, Storage & Reheating
- Make-ahead: Bars keep well in the fridge up to 4 days, flavors deepen as they sit.
- Freeze: Wrap individual bars tightly in plastic wrap and freeze up to 3 months; thaw in fridge before serving.
- Storage: Store in an airtight container in the fridge to keep them fresh and avoid drying out.
- Reheating: Serve chilled or warm slightly in an oven at 300°F for about 5 minutes if preferred warm.
FAQs
- Can I use frozen blueberries instead of fresh? Yes, but thaw and drain them well first to avoid excess moisture that can make the bars soggy.
- How do I know when the lemon filling is done? Look for filling that’s set around the edges but still has a slight jiggle in the center; it will firm up as it cools.
- Can I make these bars gluten-free? Absolutely! Swap all-purpose flour with a gluten-free blend suited for baking—just check if it requires extra binding.
- Why do I need to chill the bars after baking? Chilling helps the filling set fully, making the bars easier to cut and enhancing flavor melding.
- What’s the best way to cut neat bars? Use a sharp knife warmed under hot water; wipe dry between slices to prevent sticking.
Lemon Blueberry Bars Recipe
Lemon Blueberry Bars combine a buttery, golden crust with a tangy lemon filling studded with fresh blueberries for a delightful dessert perfect for any occasion.
- Prep Time: 15 minutes
- Cook Time: 55 minutes
- Total Time: 3 hours 10 minutes
- Yield: 12 servings
- Category: Dessert
- Method: Baking
- Cuisine: American
- Diet: Vegetarian
Ingredients
Crust
- 2 cups all-purpose flour (250 g)
- 1 cup unsalted butter, room temperature (2 sticks / 227 g)
- ½ cup granulated sugar (100 g)
Filling
- 1 ½ cups granulated sugar (300 g)
- ¼ cup all-purpose flour (31 g)
- 4 large eggs, room temperature, beaten
- ⅔ cup lemon juice, freshly squeezed (163 g)
- 1 ½ cups fresh blueberries (222 g)
Instructions
- Prepare the Crust: Preheat your oven to 350°F. Line a 9×13 inch pan with parchment paper and spray it with nonstick cooking spray to prevent sticking.
- Mix the Crust Ingredients: In a medium bowl, blend the room temperature butter, all-purpose flour, and granulated sugar using a pastry cutter or fork until combined and crumbly.
- Press and Bake the Crust: Press the mixture evenly into the bottom of the prepared pan. Bake for 25 minutes or until the crust is firm and golden brown.
- Prepare the Filling: In a medium bowl, whisk together the granulated sugar and flour. Then add the beaten eggs and continue whisking until smooth. Stir in the freshly squeezed lemon juice.
- Assemble and Bake: Pour the lemon filling evenly over the baked crust. Sprinkle the fresh blueberries evenly over the top. Bake for 30 minutes or until the sides just start to turn golden.
- Cool the Bars: Remove from the oven and let the bars cool to room temperature. Then transfer to the refrigerator and chill for at least 2 hours until completely set.
- Serve: Before serving, dust the top with confectioners’ sugar for a sweet finishing touch. Cut into squares and enjoy.
Notes
- Ensure eggs are at room temperature for better mixing and texture in the filling.
- Freshly squeezed lemon juice provides the best flavor; bottled lemon juice may alter the taste.
- Chilling the bars is necessary to set the lemon filling properly.
- Parchment paper lining helps to remove the bars easily from the pan.
- Use low-fat butter for a slightly lighter version, but it may affect the texture of the crust.
- Blueberries can be gently tossed in a little flour before sprinkling to prevent sinking.